View/Purchase Miles M.18 24in Wingspan Plan
Hi all, it’s a new year. Hope your 2021 is going well so far.
Things slowed down a bit over the holidays, but our modelers have finished their Miles M.18 models and they’re ready to fly. In this update, we’ll touch on details, final assembly, noseplug assembly and specifications. This will be our last build update.
Details
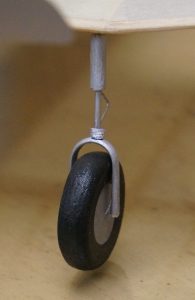
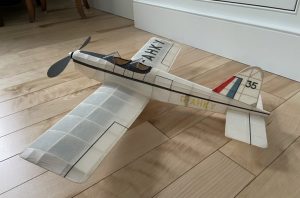
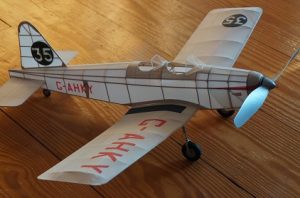
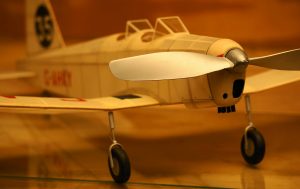
We closed the previous update discussing the Landing Gear leg wire installation in the wing. Now lets look at how one of our modelers fabricated the scale LG legs using 1/8in dia reed. Short lengths of reed were split in half and soaked in a shallow basin of water overnight. The pliant reed was then hot-bent around a soldering iron to form the unique stirrup-shaped undercarriage legs. A .020 hole was drilled in the top center and a groove etched into one half of the inside edge to fit the music wire leg. Before cementing the stirrup in place, short lengths of full-section reed, plastic straw and nylon brush bristles were used to fabricate the upper shock absorber portion of the LG leg. These pieces were slid over, or slotted and fitted onto the music wire leg. The stirrup was then fitted to the lower part of the wire LG leg and cyano’d in place. The finished LG leg assemblies were carefully sprayed with silver Krylon before the wheels were installed. The wing surfaces were carefully masked to keep any silver overspray off the tissue covering.
The Kings Cup M.18 wheels were made up of 1/8in sheet balsa cores and 1/8in thick foam tray sides. The wheel disc and rim was embossed onto the foam sides using a heated 7/16in socket with a 3in extension. Holding the extension in the hand, the socket was heated and gently pressed/turned onto the foam sides to form the wheel and rim. The outer edges of the wheel were shaped to a rounded section with a razor and sandpaper. The wheels were bushed with small diameter brass tubing, the discs covered with silver tissue and the tires painted black to finish.
Both modelers added details per the plan and photos of their aircraft modeled – windscreens, exhausts, airscoops, headrests, etc.
Final Assembly
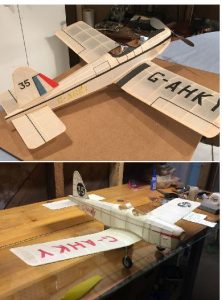
Final assembly was straightforward with this model. Both modelers did a trial assembly with the covered components to ensure proper fit. Some sanding of the fuselage wing saddle was required to get a seamless fit with the wing center section.
Noseplug & Propeller Assembly
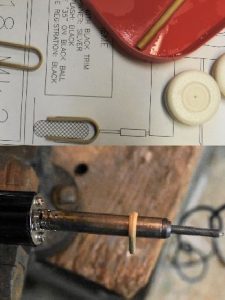
The final step before initial flight testing with most models is completing the noseblock or noseplug assembly. This includes the thrust bushing, the propeller bushing and free wheeler.
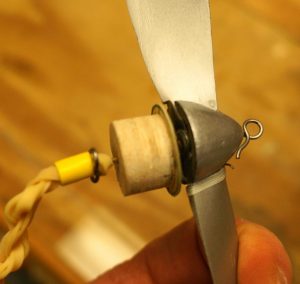
The Kings Cup model’s noseplug was drilled with several degrees of down and side thrust and the thin-walled 1/16 O.D. brass tube used for the thrust bushing . The round noseplug will not be keyed until after initial flight testing as it may be rotated slightly to alter the down and side thrust mix. A modified 9.25in dia Czech P-30 prop was bushed for a Henry Struck tube-in-tube setup and a turned balsa spinner fitted. A simple latch free wheeler was installed on the prop and the noseplug assembly was completed using a .030in dia music wire prop shaft with a “figure eight hook” and an external winding loop at the front of the spinner so the motor can be wound with the noseplug and propeller in place.
Completed Model Specifications
Despite some significantly different approaches being taken – especially in the covering and tissue finishing areas – the models came in at essentially the same weight. The Scottish Restoration M.18 model weighs in at 30 grams without motor, while the Kings Cup model finished out at 29.3 grams. With 110 – 115 sq in of wing area, the wing loading is below .30 g/sq in which is very light. Both models should have the potential for high performance.
As mentioned earlier, the Kings Cup model is fitted with a large 9.25in dia prop. It should fly with a 2 loops of 1/8in Tan rubber motor about 30in long before braiding. A shorter motor will be used for initial flight tests.
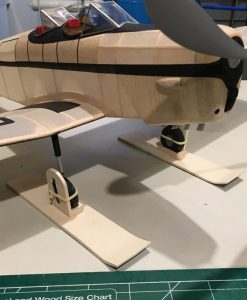
The Restoration M.18 model is fitted with a 7in Peck propeller and inital flight testing will be done with an 18in loop of 3/16 Tan rubber. One reason for the smaller prop is that this modeler has fitted his M.18 with skis and intends to fly it ROS (rise off snow). Wow, can’t wait to see that!
Closing the M.18 Build
Well, it’s been a lot of fun following these builds over the last couple of months. We hope the different approaches and techniques shared were helpful as well as the pattern downloads made available.
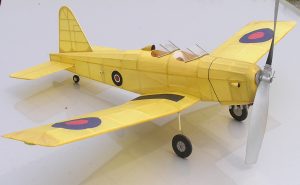
To close, we’ve dug up a photo of designer Tom Nallen 1’s original model from 2006. It’s a beauty, and yet another illustration of how each modeler inevitably makes his or her model their own. One of the true joys of scale modeling.
Final assembly and details. Landing gear, noseplug & prop assemblies. We’re ready to fly!
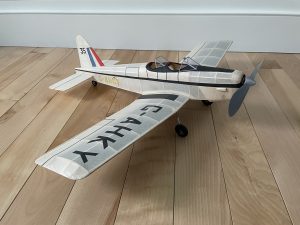 Restoration M.18 version completed